Connect ChatGPT.
OAuth · PATGive ChatGPT — including Codex and the OpenAI Responses API — a live connection to your markdown workspace over the Model Context Protocol. It can read your documents, use folder descriptions as context, and create, update, and organise notes — instead of you re-pasting the same background into every chat.
Two ways to authenticate, both covered here:
- ›OAuth sign-in — the easiest path for the ChatGPT app (Plugins). Paste one URL and sign in; there is no token to create or copy.
- ›Personal Access Token (PAT) — for Codex, the OpenAI Responses API, and custom GPT Actions, which send their own credential.
Both require an MDflow Pro account — all API and MCP access is Pro-gated. OAuth is currently in beta; the token path is a fully supported fallback everywhere.
Which surface are you connecting?
| Field | What to enter |
|---|---|
| ChatGPT app (Plugins) | Use OAuth — add a custom plugin and sign in. See Method A. |
| Codex (CLI / IDE) | Runs MDflow's local MCP server with a PAT. See Method B. |
| OpenAI Responses API | Pass the hosted server as a remote MCP tool with a PAT header. See Method C. |
| Custom GPT (GPT builder) | Uses Actions against MDflow's REST API with a static OAuth client. See Method D. |
Method A — OAuth sign-in (ChatGPT Plugins)
ChatGPT calls custom MCP servers Plugins (you may still see them called connectors elsewhere). They speak the same MCP + OAuth 2.1 flow as Claude and register automatically (Dynamic Client Registration), so connecting is paste a URL and sign in — no token, no client ID or secret. Adding one is gated behind Developer mode, available to Plus, Pro, Business, Enterprise, and Edu accounts on the web.
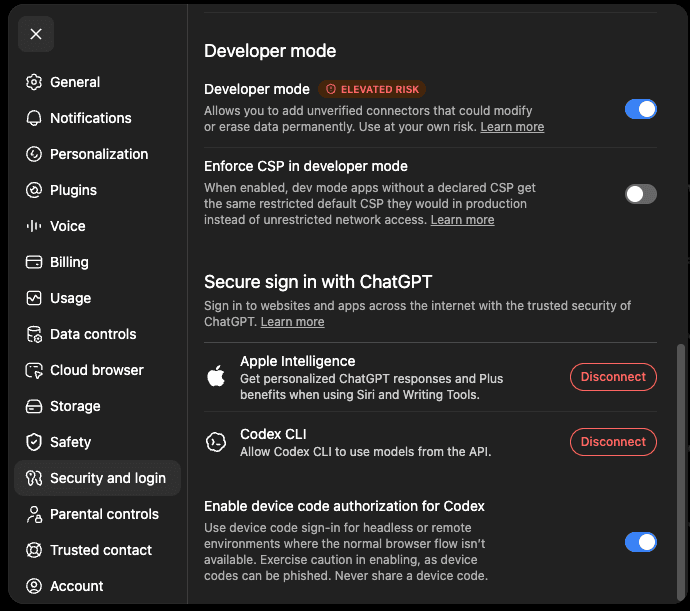
Turn on Developer mode
Open Settings → Security and login and switch Developer mode on. It carries an Elevated risk label because custom MCP servers can read and modify your data — that is expected for a server you trust.
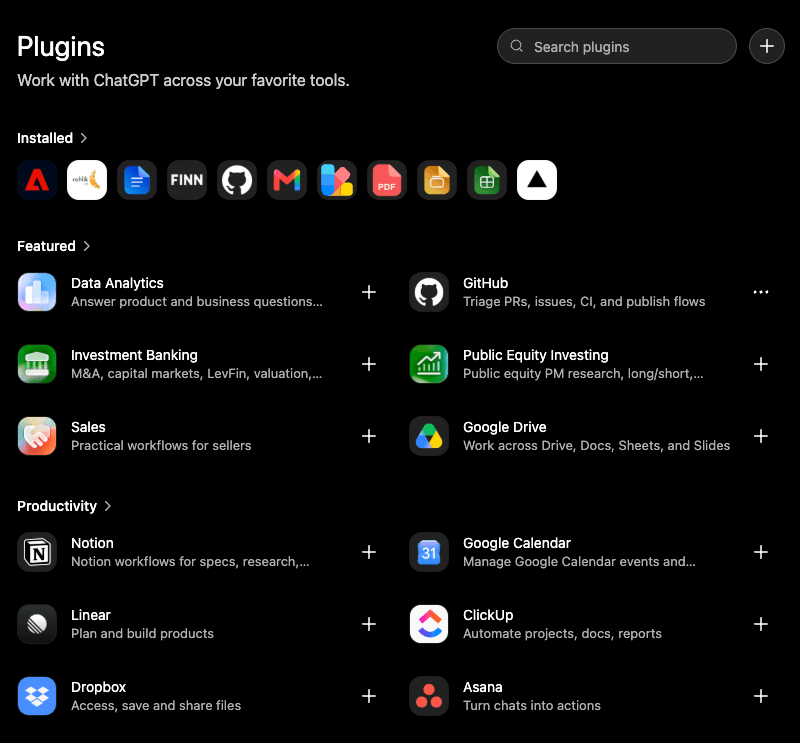
Open Plugins and add one
Go to Settings → Plugins (or chatgpt.com/plugins) and click the + button in the top-right to create a new plugin.
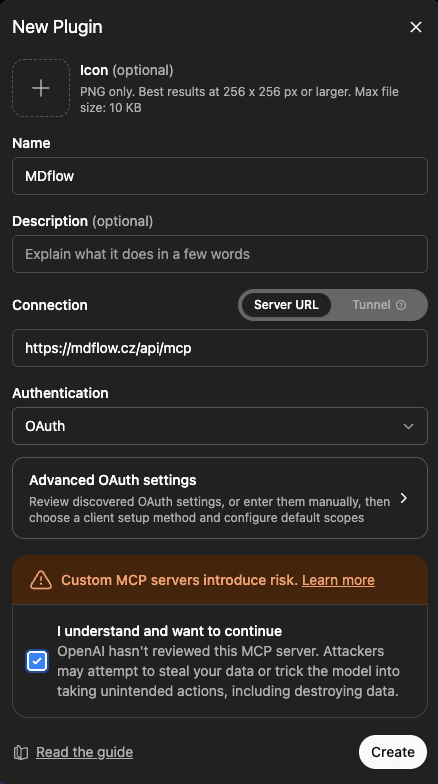
Fill in the New Plugin dialog
Authentication is detected as OAuth — there is no client ID or secret to enter. Leave it on OAuth.
| Field | What to enter |
|---|---|
| Name | Anything, e.g. MDflow |
| Description | Optional — leave blank or describe MDflow |
| Connection | Server URL = https://mdflow.cz/api/mcp |
| Authentication | OAuth — no client ID / secret |
| Risk notice | Tick I understand and want to continue, then Create |
Sign in and approve
ChatGPT sends you to MDflow. Sign in if needed, then review and Approve the consent screen. The MDflow tools appear in the plugin.
Authorize ChatGPT
ChatGPT wants to connect to your MDflow account.
This will allow ChatGPT to:
- •Confirm your identity
- •See your email address
- •See your name and avatar
- •Full access to read and modify your MDflow documents (Pro plan required for API access).
/api/mcp returns 401 with a WWW-Authenticate challenge pointing at /.well-known/oauth-protected-resource(RFC 9728). ChatGPT discovers the authorization server, registers itself, runs the OAuth 2.1 authorization-code + PKCE flow through MDflow's consent page, and calls the API with the issued JWT.Method B — Codex
Codex launches MCP servers it finds in ~/.codex/config.toml. Point it at MDflow's local stdio server and pass a Personal Access Token through the environment.
Create a Personal Access Token
Sign in to MDflow, open Settings, and create a token. It starts with mdf_. Copy it now — you won't see it again.
Download the local server
Grab server.mjs and run npm install — the full download and prerequisites (Node.js 18+) are in the MCP documentation.
Add the server to config.toml
Use the absolute path to server.mjs (run pwd in the mdflow-mcp folder to get it).
[mcp_servers.mdflow]
command = "node"
args = ["/absolute/path/to/mdflow-mcp/server.mjs"]
env = { MDFLOW_API_TOKEN = "mdf_your_token_here" }Restart Codex and try it
Restart so it picks up the config, then ask:
envblock, never in a chat prompt or tool argument — MDflow's server refuses to accept it as a tool parameter. Tokens grant workspace-level access, including write and delete, and can be revoked anytime from Settings.Method C — OpenAI Responses API
Wiring a ChatGPT-family model to MDflow programmatically? Pass the hosted server as a remote mcp tool with a headers object carrying your Personal Access Token. No local server needed — the request reaches https://mdflow.cz/api/mcp directly.
{
  "model": "gpt-5.2",
  "tools": [
    {
      "type": "mcp",
      "server_label": "mdflow",
      "server_url": "https://mdflow.cz/api/mcp",
      "headers": { "Authorization": "Bearer mdf_your_token_here" }
    }
  ],
  "input": "Get information about onboarding from mdflow."
}
The server is stateless with a 60-requests-per-minute limit per token; 429 responses carry Retry-After in seconds. The same operations are available as a plain HTTP API with the same token.
Method D — Custom GPT Actions (advanced)
The classic GPT builder does not speak MCP or automatic registration — it needs a static OAuth clientand the endpoint URLs typed in by hand. This path is only for building a custom GPT against MDflow's REST API; most people want Method A.
Authentication → OAuth Apps → Add client (type confidential, token_endpoint_auth_method: client_secret_post). After you save the GPT's auth config, copy the callback URL the GPT builder generates (https://chat.openai.com/aip/g-<your-gpt-id>/oauth/callback) back into the OAuth App's redirect URIs — no wildcards allowed.In the GPT builder, open Configure → Actions → Authentication and fill in:
| Field | What to enter |
|---|---|
| Schema / Import URL | https://mdflow.cz/openapi.json |
| Authentication type | OAuth |
| Client ID / Secret | From the Supabase OAuth App above |
| Authorization URL | https://avpohqkozlquuxzqqtsx.supabase.co/auth/v1/oauth/authorize |
| Token URL | https://avpohqkozlquuxzqqtsx.supabase.co/auth/v1/oauth/token |
| Scope | openid email profile |
| Token exchange method | Default (POST) |
After saving, copy the callback URL ChatGPT shows you back into the Supabase OAuth App's redirect URIs to complete the two-step handshake. avpohqkozlquuxzqqtsxis MDflow's public Supabase project ref — not a secret.
Troubleshooting
| Symptom | Cause & fix |
|---|---|
| ChatGPT won't connect via OAuth | Likely the CIMD preference (see the beta note above). Use a Personal Access Token via Codex or the Responses API for that surface for now. |
No + button on the Plugins page | Turn on Developer mode under Settings → Security and login. Custom plugins need a Plus, Pro, Business, Enterprise, or Edu account on the web. |
403 Pro plan required after connecting | The signed-in account is on the Free plan. Upgrade at Settings — the connection stays, calls start working. |